Oblivion:Lipsand Tarn
|
|||
|---|---|---|---|
| # of Zones | 2 | ||
| # of Welkynd Stones | 19 | ||
| # of Varla Stones | 1 | ||
| Occupants | |||
| Vampires (1 boss-level Vampire) |
|||
| Important Treasure | |||
| 1 boss-level Coffin | |||
| Console Location Code(s) | |||
| LipsandTarnExterior, LipsandTarn, LipsandTarn02 | |||
| Region | |||
| Colovian Highlands | |||
| Location | |||
| North of Chorrol, close to the Jerall Mountains | |||
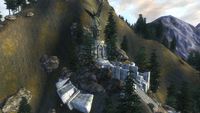
Lipsand Tarn is a medium-sized Ayleid ruin north of Chorrol containing vampires. It contains two zones: Lipsand Tarn and Lipsand Tarn Lorsel.
Notes[edit]
Exterior[edit]
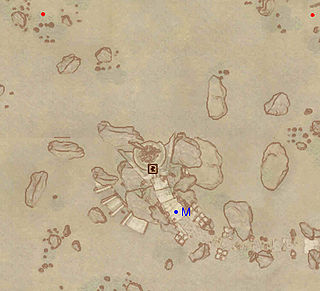
- The exterior is located at coordinates: Tamriel -18, 33
- This location's map marker (M on map) is named Lipsand Tarn (editor name LipsandTarnMapMarker). The entrance door is NNW of the marker, 60 feet away.
- 1 Wilderness Creature (Forested Mountains variety) is near the entrance
- 1 Wilderness Creature (Mountains variety) is near the entrance
- The following plants can be found near the entrance: 4 Clouded Funnel Cap plants
Zone 1: Lipsand Tarn[edit]
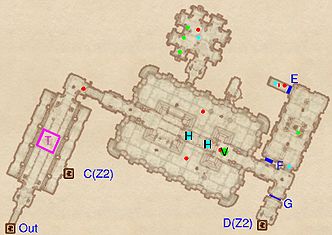
Immediately when descending down the stairs, there is a Potion of Speed at the bottom on the floor right of the staircase. The next chamber has an interesting trap mechanism (T): running through the chamber results in two sections of wall dropping in front and behind you, trapping you, before you're lifted upwards on a ceiling spike trap. It is thus recommended that you stay against either the right or left walls of this chamber to avoid the trap. You can also use the trap to your advantage by luring the nearby enemy into it. The door at C in this room is difficult to access from the floor of the chamber, since it is blocked by a large wall and parapet. It is meant to be used as a path back from Lipsand Tarn Lorsel, but can accessed by skillfully jumping as the trap is rising. Also in the chamber are four Welkynd stones.
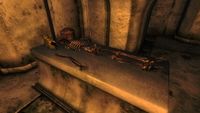
The next area is a massive chamber on two levels and you will enter on a raise walkway, from where you can snipe at the two enemies below. Proceeding along the walkway will activate the nearest stone steps (H) but you will need to activate the other set of stone steps in order to advance. Unless you have a high enough Acrobatics skill, to do so head to the southwestern corner and take the set of stairs heading downwards into a small room. Here you will find three minor loot chests (one a coffin), five Welkynd stones high up on pedestals and a stone altar with an Ayleid skeleton and an Elven Ceremonial Helmet, all guarded by an enemy. On the stone pillar in the middle of the room is a press block (cyan dot on map) which raises the other stone steps. Head back up and continue along the walkway, looting the Varla Stone (V) along the way.
From here, there's a doorway to the next zone of the dungeon that is blocked by a gate (G). At first, the push block in the adjacent room would seem to be the way to open the gate. However, getting near this block will lock you in the room by closing door (F). Activate the push block to open door (E), which leads to a tiny alcove off of the room containing up to two enemies and the push block that will both free you and open gate (G) to the next zone. In the room itself are a minor loot chest, four easily-accessible Welkynd stones and two blazing braziers.
Occupants:
- 1-2 Vampire Beasts (level-dependent Rat, Wolf, or Timber Wolf)
- 3 Vampires
- 2 archer Vampires
Treasure:
- 1 Varla Stone at location V on map
- 2 Ayleid Casks 01 (1 locked)
- 1 Chest 01 (locked)
- 1 Coffin 01
- 13 Welkynd Stones. 4 will be found in the first corridor, 5 in the room with the button to shift the stone steps, and 4 in the final room (1 of which will be on the ground).
- The other following items will always be found: 1 Elven Ceremonial Helmet (pretty but worthless) and 1 Potion of Speed
Traps:
- 4 Ceiling Spikes traps at location T on map
Doors and Gates:
- There are three doors in/out of this zone
- 1 door (at Out) leads outside
- 2 doors (at C and D) lead to the zone Lipsand Tarn Lorsel
- 2 Hidden Doors at E and F
- 1 Iron Gate (opened remotely) at G
Other:
- 2 Stone Steps (rise to form steps when activated) at locations H on map
Notes:
- The trap mechanism close to the entrance of this level can actually be exploited to gain quick access to the ledge leading to door (C). As the center trap raises to the ceiling, you can jump off the platform midway and land on the ledge.
Zone 2: Lipsand Tarn Lorsel[edit]
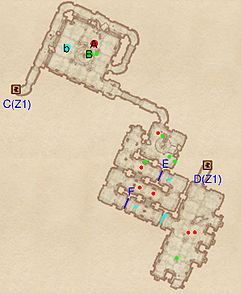
The primary goal for this zone is getting the boss chest at (B) located near the end of this zone. The first room you enter via door D contains a minor loot chest and five Welkynd stones high up on pedestals, all guarded by two enemies. Open the nearby gate via the push block, though beware as it closes after approximately five seconds later, which will lock you into the corridor and force you to go through door (C) in order to escape. The winding corridor ahead hosts a minor loot chest and three enemies, though you can use the gates at (E) and (F) to split them and even snipe at the them through them. Following this corridor will lead you into a room with a Welkynd stone lying in the bottom left corner as well as three minor loot chests. In the next room is the boss-level Vampire (A), who is surrounded by torches, while the rest of the room is fairly dark, which may allow for sneak attacks. Also in this room is the boss chest (B), another minor loot chest, a sleeping slab (b) and a walkway leading to door (C). This takes you to the unreachable ledge in the first zone, from which you can jump down and leave the ruins.
Occupants:
- 1 boss-level Vampire (50% chance Vampire Matriarch, 50% chance Vampire Patriarch) at location A on map
- 6 Vampires
Treasure:
- 1 boss-level Coffin (Vampire variety) at location B on map
- 1 Ayleid Cask 02 (locked)
- 1 Chest 01 (locked)
- 1 Chest 02 (locked)
- 1 Chest 03
- 1 Chest 04
- 1 Coffin 01
- 6 Welkynd Stones. 5 will be in the first room when coming from door D, and one will be on the floor at the entrance to the room before the room containing the boss.
- The following ingredients will always be found: 2 samples of Bonemeal and 2 Bread Loaves
Doors and Gates:
- There are two doors (at C and D) in/out of this zone, both leading to the zone Lipsand Tarn
- 2 Iron Gates (opened remotely) at E and F
Other:
- 1 sleeping slab at location b on map
