Shivering:Aichan
| This place page is currently being rechecked as part of the Oblivion Remastered Project. The page is being checked in several stages to verify any changes due to the release of Oblivion Remastered. All users are welcome to make changes to the page. If you make a change that is relevant to the project, please update this template accordingly, and make sure you have observed the project guidelines. Details Walkthrough: not written Interior Remastered Images: not added |
|
|||
|---|---|---|---|
| # of Zones | 1 | ||
| Occupants | |||
| Grummites, Scalons | |||
| Important Treasure | |||
| 1 Madness Ore Deposit | |||
| Console Location Code(s) | |||
| XPAichanExterior, XPAichan01 | |||
| Region | |||
| Mania | |||
| Location | |||
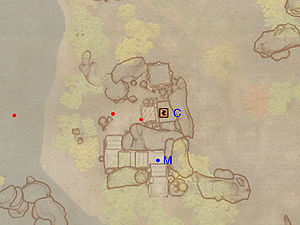
| On The Laughing Coast, west-northwest of Wretched Camp | |||
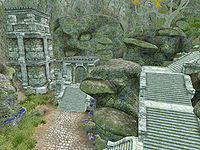
Aichan is a small ruin on The Laughing Coast where the law-breakers of Mania are sent. It contains only one zone, Aichan Prison.
It is a prison guarded by Grummites, similar to Corpserot Passage. This is where the Golden Saints will throw you if you are arrested.
Notes[edit]
- This ruin contains 18 Flame Stalk plants, 3 Screaming Maw plants, 4 Watcher's Eye plants, and 17 Root Stalk plants.
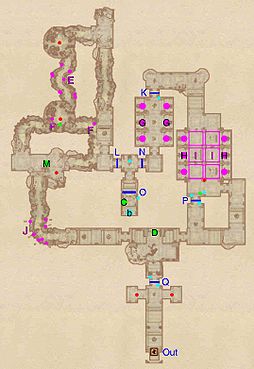
- To get past the doors at K and L you must commit a crime in Bliss then go to jail. You will then appear in the sealed-off section.
Exterior[edit]
- The exterior is located at coordinates: SEWorld -12, 9
- This location's map marker (M on map) is named Aichan. The entrance door is N of the marker, 60 feet away.
- 2 Grummites (Mania) are near the entrance
- 1 Aquatic Monster (Mania) is near the entrance
- The following plants can be found near the entrance: 8 Alocasia plants, 8 Hydnum Azure plants, and 4 Worm's Head plants
- A bowl-shaped object labeled
0007131acan be seen floating high above the ruin's entrance. Its position is likely an error and its intended purpose is unknown.
Zone 1: Aichan Prison[edit]
After being arrested by a Golden Saint you will find yourself in a cell near the bedroll at b, stripped of all your weapons and armor. Loot the urn (C) for a weapon and locate the push button that will lower the wall at O. In the next room you will have to decide whether to go through gate L or N, as it will close behind you. Whichever route you take, you will be able to backtrack and claim any loot you may have missed.
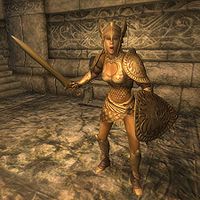
Through door L, the path is fairly linear: just make your way through the root tunnel, taking care to avoid the concentrated root worm traps at E, the occasional spore pod trap at F and the once-again concentrated root spikes traps at J. Loot the madness ore deposit at M and prepare for a fight with the prison guard. If you went through door N, the path is again linear. Avoid the fire from the four hunger statues at G and jump across the trapped floors at H. If you do fall down, you will be hit by dart traps (I) and face a grummite; but you will be able to loot an urn.
Before entering the final room, make sure to heal as you are about to face the prison guard. Immediately make a run for the Evidence Chest at D and claim all of your belongings back, making it much easier to dispose of the guard. Once the fight is over, open gate Q by activating the push block nearby (cyan dot on map) and proceed up the stairs to your freedom at Out.
Occupants:
- 2 Envious Grummites
- 1 Grummite (Mania)
- 3 Scalons (at low levels will be a Young Baliwog) (Mania)
- 1 Golden Saint Turnkey
Treasure:
- 1 Madness Ore Deposit (1-4 Madness Ore; non-respawning) at location M on map
- 1 Battered Chest (is actually an urn; contains two weapons) at C
- 1 Chest
- 1 Evidence (chest; non-respawning) at D
- 1 Hollowed Stump (Healing)
- The other following items will always be found: 1 Madness Ore
- The following plants will always be found: 18 Flame Stalk plants, 3 Screaming Maw plants, 4 Watcher's Eye plants, and 17 Root Stalk plants
Traps:
- 11 Root Worm traps at locations E on map
- 2 Spore Pod traps at F
- 6 Hunger Statues (weaker variant of normal Hunger Statue) at G
- 6 Hunger Statue traps (normal variety) at H
- 6 Trapped Floors (drops you down into Dart Traps) at I
- 7 Root Spikes traps at J
Doors and Gates:
- There is one door (at Out) in/out of this zone, leading outside
- 5 Metal Gates (initially closed bar gates) at K, L, N, P, and Q
- 1 Secret Wall at O
Other:
- 1 bedroll at location b on map


